
Log processor: Building a data flow
You can build an automated dataflow using the NiFi UI by:
Drag components from the toolbar to the canvas
Configure the components to meet specific needs
Connect the components together
Processor
The Processor is the most commonly used component, as it is responsible for data ingress, egress, routing, and manipulating. There are many different types of Processors. In fact, this is a very common Extension Point in NiFi, meaning that many vendors may implement their own Processors to perform whatever functions are necessary for their use case.
Adding a processor
The Processor is the most commonly used component, as it is responsible for data ingress, egress, routing, and manipulating. There are many different types of Processors. In fact, this is a very common Extension Point in NiFi, meaning that many vendors may implement their own Processors to perform whatever functions are necessary for their use case.
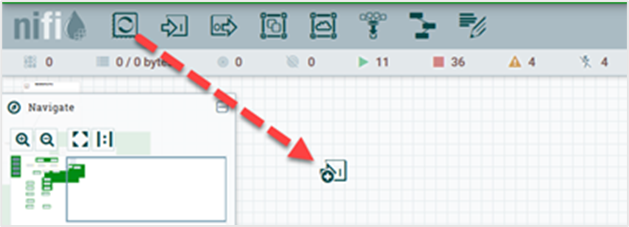
To add a Processor, drag the Processor icon and drop it into the middle of the canvas.
The Add Processor window opens.
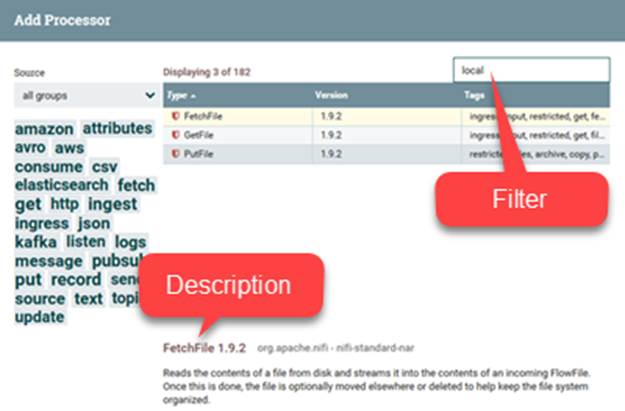
In the Add Processor window, you have different options to choose from. When a developer creates a Processor, the developer can assign tags to that Processor. These can be thought of as keywords. You can filter by these tags or by Processor name by typing into the Filter box in the top-right corner. Type in the keywords that you would think of when wanting to ingest files from a local disk. Typing in keyword file, for instance, will provide us a few different Processors that deal with files. Filtering by the term local will narrow down the list pretty quickly, as well. If we select a Processor from the list, we will see a brief description of the Processor near the bottom of the dialog.
To bring in files from a local disk into NiFi, you can use the GetFile Processor. This Processor pulls data from your local disk into NiFi and then removes the local file. Select the Processor and click ADD, it will be added to the canvas in the location that it was dropped.
Configuring a processor
Now that you have added the GetFile Processor, right click the Processor and select Configure from the context menu. The options available to you from the context menu vary, depending on the privileges assigned to you.
The following options are typically available when you have full privileges to work with a Processor:
Configure: This option allows you to establish or change the configuration of the Processor.
🔖 NOTE: For Processors, Ports, Remote Process Groups, Connections and Labels, it is possible to open the configuration dialog by double-clicking on desired component.Start or Stop: This option allows you to either start or stop a Processor, depending on the current state of the Processor.
Enable or Disable: This option allows you to enable or disable a Processor, depending on the current state of the Processor.
View data provenance: This option displays the NiFi Data Provenance table, with information about data provenance events for the FlowFiles routed through that Processor.
View status history: This option opens a graphical representation of the Processor’s statistical information over time.
View usage: This option takes the user to the Processor’s usage documentation.
View connections -> Upstream: This option allows you to see and jump to upstream connections that are coming into the Processor. This is particularly useful when processors connect into and out of other Process Groups.
View connections -> Downstream: This option allows you to see and jump to downstream connections that are going out of the Processor. This is particularly useful when processors connect into and out of other Process Groups.
Center in view: This option centers the view of the canvas on the given Processor.
Change color: This option allows you to change the color of the Processor, which can make the visual management of large flows easier.
Create template: This option allows you to create a template from the selected Processor.
Copy: This option places a copy of the selected Processor on the clipboard, so that it may be pasted elsewhere on the canvas by right-clicking on the canvas and selecting Paste.
Delete: This option allows you to delete a Processor from the canvas.
Select the Properties tab from the Configure Processor window. Once the Properties tab has been selected, we are given a list of several different properties that we can configure for the Processor. The properties that are available depend on the type of Processor and are generally different for each type. Properties that are in bold are required properties. The Processor cannot be started until all required properties have been configured. The most important property to configure for GetFile is the directory from which to pick up files.
In the Input Directory field, type ./data-in, this will cause the Processor to start picking up any data in the data-in subdirectory of the NiFi Home directory. In order for this property to be valid, create a directory named data-in in the NiFi home directory and then click the Ok button to close the dialog.
Connecting processors
Each Processor has a set of defined Relationships that it is able to send data to. When a Processor finishes handling a FlowFile, it transfers it to one of these Relationships. This allows a user to configure how to handle FlowFiles based on the result of Processing.
For example, many Processors define two Relationships: success and failure. Users are then able to configure data to be routed through the flow one way if the Processor is able to successfully process the data and route the data through the flow in a completely different manner if the Processor cannot process the data for some reason. Or, depending on the use case, it may simply route both relationships to the same route through the flow.
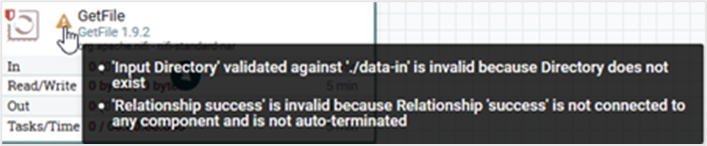
Now that we have added and configured our GetFile processor and applied the configuration, we can see in the top-left corner of the Processor an Alert icon ( Alert ) signaling that the Processor is not in a valid state. Hover over this icon, you can see that the success relationship has not been defined. This means that we have not told NiFi what to do with the data that the Processor transfers to the success Relationship.
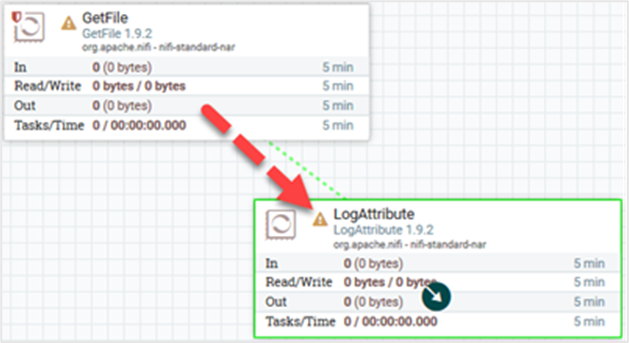
In order to address this, let’s add another Processor that we can connect the GetFile Processor to, by following the same steps above. This time, however, you will simply log the attributes that exist for the FlowFile. To do this, we will add a LogAttributes Processor.
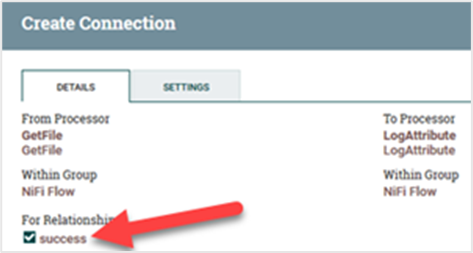
You can now send the output of the GetFile Processor to the LogAttribute Processor. Hover over the GetFile Processor with the mouse and a Connection Icon ( Connection ) will appear over the middle of the Processor. Drag this icon from the GetFile Processor and drop it to the LogAttribute Processor. Create Connection window opens.
Because GetFile has only a single Relationship, success, it is automatically selected for you.
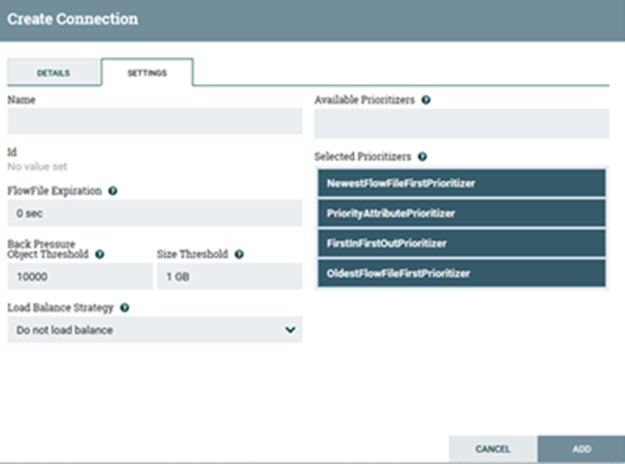
Click on the Settings tab of the Create Connection window. In the Name field, specify the name of the connection. Otherwise, the Connection name will be based on the selected Relationships.
We can also set FlowFile Expiration for the data. By default, it is set to 0 sec which indicates that the data should not expire. Change the value so that when data in this Connection reaches a certain age, it will automatically be deleted (and a corresponding EXPIRE Provenance event will be created).
The Back Pressure Object Threshold allow you to specify how full the queue is allowed to become before the source Processor is no longer scheduled to run. This allows you to handle cases where one Processor is capable of producing data faster than the next Processor is capable of consuming that data. If the back pressure is configured for each connection along the way, the Processor that is bringing data into the system will eventually experience the back pressure and stop bringing in new data so that your system has the ability to recover.
The Available Prioritizers option is available on right-hand side. This allows you to control how the data in this queue is ordered. Drag Prioritizers from the Available prioritizers list to the Selected prioritizers list in order to activate the Prioritizer. If multiple prioritizers are activated, they will be evaluated such that the Prioritizer listed first will be evaluated first and if two FlowFiles are determined to be equal according to that Prioritizer, the second Prioritizer will be used.
Click ADD to add the connection to your graph.
Note that the Alert icon has changed to a Stopped icon ( Stopped ).
The LogAttribute Processor, however, is now invalid because its success Relationship has not been connected to anything. Let’s address this by signaling that data that is routed to success by LogAttribute should be Auto Terminated, meaning that NiFi should consider the FlowFile’s processing complete and drop the data. To do this, you configure the LogAttribute Processor.
Right click on the LogAttribute Processor and click the Settings tab. Check Success under Automatically Terminate Relationships to Auto Terminate the data. Click APPLY, notice that both Processors are now stopped.
Starting and stopping a processor
At this point, you have two Processors on your graph, but nothing is happening. In order to start the Processors, click on each one individually, right-click and choose the Start menu item.
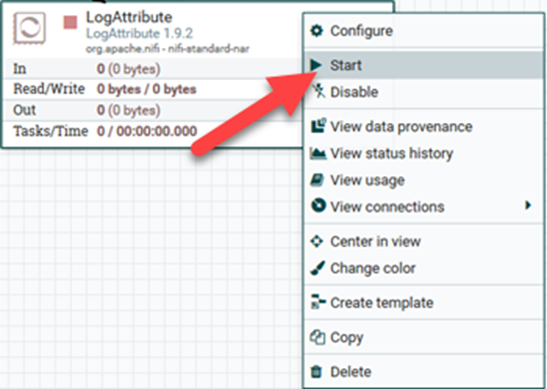
🔖 NOTE: You can also select the first Processor, and then hold the Shift key while selecting the other Processor in order to select both. Then, you can right-click and choose the Start menu item. As an alternative to using the context menu, you can select the Processors and then click the Start icon in the Operate palette.
Once started, the icon in the top left corner of the Processors will change from a stopped icon to a running icon. You can then stop the Processors by using the Stop icon in the Operate palette or the Stop menu item.