
Event processor user interface
The NiFi UI provides mechanisms for creating automated dataflows, as well as visualizing, editing, monitoring, and administering those dataflows. The NiFi UI is very interactive and provides a wide variety of information about NiFi. The UI can be broken down into several segments, each responsible for different functionality of the application.
As shown in the highlighted status bar below, a user can access information about the following attributes:
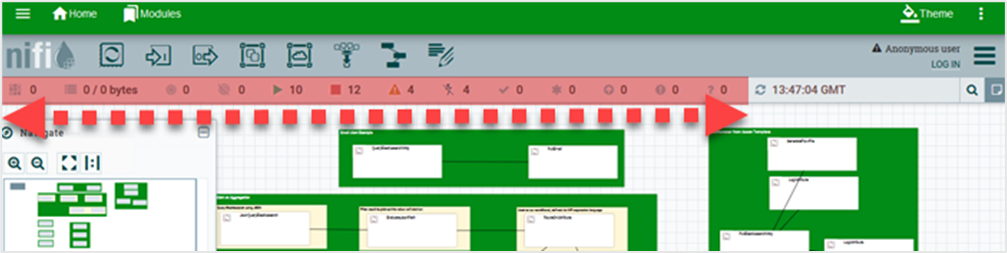
Active Threads
Total queued data
Transmitting Remote Process Groups
Not Transmitting Remote Process Groups
Running Components
Stopped Components
Invalid Components
Disabled Components
Up to date Versioned Process Groups
Locally modified Versioned Process Groups
Stale Versioned Process Groups
Locally modified and Stale Versioned Process Groups
Sync failure Versioned Process Groups
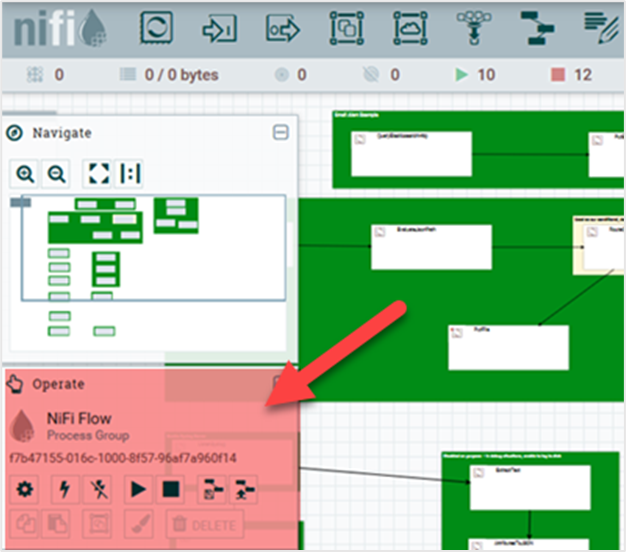
The Operate Pallete consists of buttons that manipulate the components on the canvas. They are used to manage the flow, as well as by administrators who manage user access and configure system properties, such as how many system resources should be provided to the application.
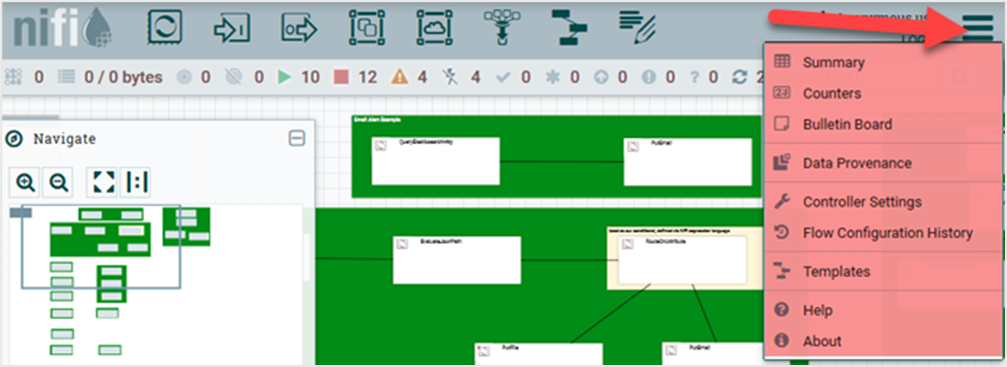
The management toolbar has buttons to manage the flow, and for a NiFi administrator to manage user access and system properties.
Additionally, the UI has some features that allow you to easily navigate around the canvas. You can use the Navigate Palette to pan around the canvas, and to zoom in and out.
The Birds Eye View of the dataflow provides a high-level view of the dataflow and allows you to pan across large portions of the dataflow.

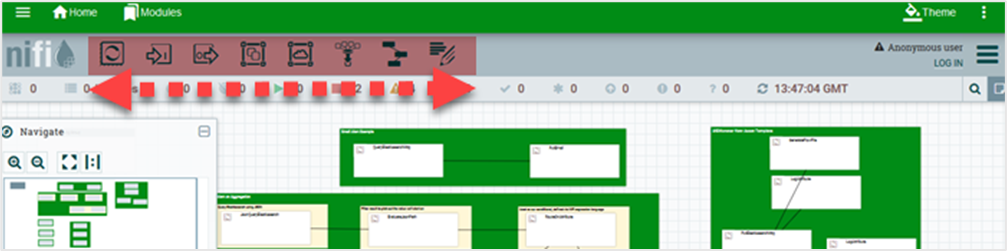
The components toolbar contains all tools for building the dataflow.
Processors
Processor pulls data from external sources, performs actions on attributes and content of FlowFiles, and publishes data to external source. User can drag the process icon on the canvas and select the desired processor for the data flow in NiFi.

Input ports
Input Ports provide a mechanism for transferring data into a Process Group. When an Input Port is dragged onto the canvas, the user is prompted to name the Port. All Ports within a Process Group must have unique names.

All components exist only within a Process Group. When a user initially navigates to the NiFi page, the user is placed in the Root Process Group. If the Input Port is dragged onto the Root Process Group, the Input Port provides a mechanism to receive data from remote instances of NiFi via Site-to-Site. In this case, the Input Port can be configured to restrict access to appropriate users, if NiFi is configured to run securely.
The output port is used to transfer data to the processor, which is not present in that process group. After dragging this icon, NiFi asks to enter the name of the Output port and then it is added to the NiFi canvas.
Output ports

Output Ports provide a mechanism for transferring data from a Process Group to destinations outside of the Process Group. When an Output Port is dragged onto the canvas, the user is prompted to name the Port. All Ports within a Process Group must have unique names.
If the Output Port is dragged onto the Root Process Group, the Output Port provides a mechanism for sending data to remote instances of NiFi via Site-to-Site. In this case, the Port acts as a queue. As remote instances of NiFi pull data from the port, that data is removed from the queues of the incoming Connections. If NiFi is configured to run securely, the Output Port can be configured to restrict access to appropriate users.
Process groups
Process Groups can be used to logically group a set of components so that the dataflow is easier to understand and maintain. When a Process Group is dragged onto the canvas, you are prompted to name the Process Group. All Process Groups within the same parent group must have unique names. The Process Group will then be nested within that parent group.

Once you have dragged a Process Group onto the canvas, right-click on the Process Group to select an option from context menu. The options available to you from the context menu vary, depending on the privileges assigned to you.
Contect menus
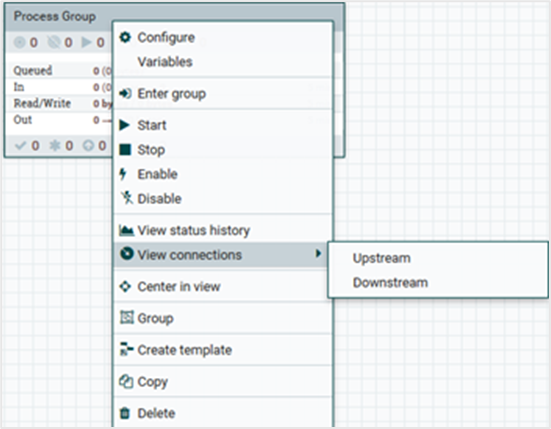
While the options available from the context menu vary, the following options are typically available when you have full privileges to work with the Process Group:
Configure: This option allows you to establish or change the configuration of the Process Group.
Variables: This option allows you to create or configure variables within the NiFi UI.
Enter group: This option allows you to enter the Process Group.
Start: This option allows you to start a Process Group.
Stop: This option allows you to stop a Process Group.
View status history: This option opens a graphical representation of the Process Group’s statistical information over time.
View connections -> Upstream: This option allows you to see and jump to upstream connections that are coming into the Process Group.
View connections -> Downstream: This option allows you to see and jump to downstream connections that are going out of the Process Group.
Center in view: This option centers the view of the canvas on the given Process Group.
Group: This option allows you to create a new Process Group that contains the selected Process Group and any other components selected on the canvas.
Create template: This option allows you to create a template from the selected Process Group.
Copy: This option places a copy of the selected Process Group on the clipboard, so that it may be pasted elsewhere on the canvas by right-clicking on the canvas and selecting Paste.
Delete: This option allows you to delete a Process Group.
Remote process group
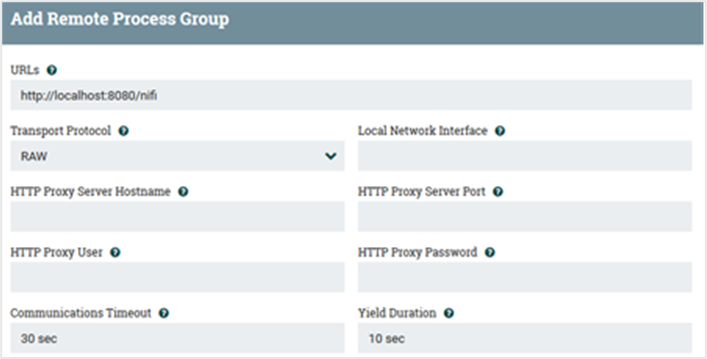
Remote Process Groups appear and behave similar to Process Groups. However, the Remote Process Group (RPG) references a remote instance of NiFi. When an RPG is dragged onto the canvas, rather than being prompted for a name, the user is prompted for the URL of the remote NiFi instance.

If the remote NiFi is a clustered instance, the URL that should be used is the URL of any NiFi instance in that cluster. When data is transferred to a clustered instance of NiFi via an RPG, the RPG will first connect to the remote instance whose URL is configured to determine which nodes are in the cluster and how busy each node is. This information is then used to load balance the data that is pushed to each node. The remote instances are then interrogated periodically to determine information about any nodes that are dropped from or added to the cluster and to recalculate the load balancing based on each node’s load.
Local Network Interface: In some cases, it may be desirable to prefer one network interface over another. For example, if a wired interface and a wireless interface both exist, the wired interface may be preferred. This can be configured by specifying the name of the network interface to use in this box. If the value entered is not valid, the Remote Process Group will not be valid and will not communicate with other NiFi instances until this is resolved.
Transport Protocol: On a Remote Process Group creation or configuration dialog, you can choose Transport Protocol to use for Site-to-Site communication.
By default, it is set to RAW which uses raw socket communication using a dedicated port. HTTP transport protocol is especially useful if the remote NiFi instance is in a restricted network that only allow access through HTTP(S) protocol or only accessible from a specific HTTP Proxy server. For accessing through a HTTP Proxy Server, BASIC and DIGEST authentication are supported.
Funnels
Funnel is used to transfer the output of a processor to multiple processors. User can use the below icon to add the funnel in a NiFi data flow.

Funnels are used to combine the data from many Connections into a single Connection. This has two advantages.
First, if many Connections are created with the same destination, the canvas can become cluttered if those Connections have to span a large space. By funneling these Connections into a single Connection, that single Connection can then be drawn to span that large space instead.
Secondly, Connections can be configured with FlowFile Prioritizers. Data from several Connections can be funneled into a single Connection, providing the ability to Prioritize all of the data on that one Connection, rather than prioritizing the data on each Connection independently.
Templates
This icon is used to add a data flow template to NiFi canvas. This helps to reuse the data flow in the same or different NiFi instances. After dragging, a user can select the templates already added in the NiFi.

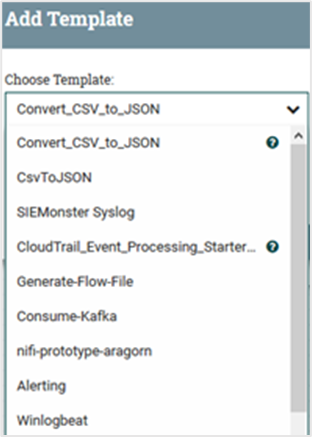
Templates can be created from the components toolbar, or they can be imported from other dataflows. These Templates provide larger building blocks for creating a complex flow quickly. When the Template is dragged onto the canvas, the user is provided with a window to choose which Template to add to the canvas.
Click the drop-down menu to view all the available Templates. Any Template that was created with a description will show a question mark icon, indicating that there is more information. Hovering over the icon with the mouse will show the description.
Labels
These are used to add text on NiFi canvas about any component present in NiFi. It offers a range of colors used by a user to add aesthetic sense.

Labels are used to provide documentation to parts of a dataflow. When a Label is dropped onto the canvas, it is created with a default size. The Label can then be resized by dragging the handle in the bottom-right corner. The Label has no text when initially created.
To add text to the Label, right click on Label and select Configure.