KB - Pausing Container Restarts
Problem
In certain cases a pod will continuously restart. There are various situations where this could occur and some examples are:
corrupted file system
inability to start services due to service dependency not being satisfied
LIveness/Readiness probe failure
Sometimes it is required to start the pod to access the file system to make changes such as config corrections or apply fixes. The following process defines how to do this.
NOTE: Be VERY careful performing these actions. They can have critical impact on the infrastructure and the potential impact should not be underestimated. If you do not feel comfortable performing these changes please log a ticket with the SIEMonster support team (costs apply). Please also note the following critical considerations:
Only code safe editors are ever to be used e.g. notepad++, vs code or similar. Wordpad, windows notepad etc should never be used, not even in emergencies.
The following instructions deal with editing YAML configuration files. YAML files are considered corrupted if a TAB is used (accidentally or purposefully) and should be discarded and a fresh file used. Only spaces are allowed.
Solution
Prerequisites:
The following are required for this solution:
kubectl access with access to the cluster with the failing pod
Linux/Vim/YAML knowledge
To pause the pod the following steps need to be taken:
First establish which pod is constantly restarting
It can be in multiple different states e.g. container creating, crashloopback off or even running for short periods of time.
Check the restart counter to see if it is incrementing.
Once the container has been identified look at the ending characters to determine if it’s a statefulset or a deployment. Stateful sets will always have the pod ending with a single integer e.g. -0 or -1 etc. Deployments will end with a random character sequence at the end as per screenshot below.

To work with a statefulset, remove the hyphen and the integer and the end. With a pod from a deployment remove the hyphen and the random strings generated (please refer to the screenshot above for the example). Examples below.
BASH#For statefulsets test75-qa-misp-0 becomes test75-qa-misp #For deployments test75-qa-opencti-connector-amitt-6b6d486d9-fr4mj becomes test75-qa-opencti-connector-amittWe shall refer to the output of the above as pod_variable for simplicity
The next step is to verify the name of the deployment or sts. Continuing with the examples above you can tie that information in with the following examples.
BASH#To verify the STS (Statefulset) name kubectl -n test75-qa get sts |grep test75-qa-misp #The above will provide you with one or more results. Such as below test75-qa-misp 1/1 35d test75-qa-misp-db 1/1 35d #To verify the deployment name kubectl -n test75-qa get deployment |grep test75-qa-opencti-connector-amitt #The above will provide you with output such as the below test75-qa-opencti-connector-amitt 1/1 1 1 35dWith the above information verified, a backup of the item that will be edited now needs to be created. This is to ensure that the service can be restored should mistakes be made in the steps below. Based on the above pod examples, the following commands will generate the required backups
BASH#For STS backups kubectl -n test75-qa get sts test75-qa-misp -o yaml > <path_of_backup/test75-qa-misp-bak.yaml-<date>-<user>> #e.g. kubectl -n test75-qa get sts test75-qa-misp -o yaml > /home/ec-user/test75-qa-misp-bak.yaml-20231213-SM #Perform a cat command to ensure the file contents is correct. cat <specified_path>/test75-qa-misp-bak.yaml-20231213-SM #NOTE: The -o yaml is not zero but the letter o. #For Deployment backups #For STS backups kubectl -n test75-qa get deployment test75-qa-opencti-connector-amitt -o yaml > <path_of_backup/test75-qa-opencti-connector-amitt.yaml-<date>-<user>> #e.g. kubectl -n test75-qa get deployment test75-qa-opencti-connector-amitt -o yaml > /home/ec-user/test75-qa-opencti-connector-amitt.yaml-20231213-SM #Perform a cat command to ensure the file contents is correct. cat <specified_path>/test75-qa-opencti-connector-amitt-20231213-SMNow that the backups have been made the production item can be edited. With the exception of the kubectl command the changes inside the yaml are identical. To avoid confusion the following will only contain one edit.
#Edit the sts
kubectl -n test75-qa edit sts test75-qa-misp

#or

#Edit the deployment
kubectl -n test75-qa edit deployment test75-qa-opencti-connector-amitt
when the editor opens, move to the line that start with imagePullPolicy
Press [Insert] and then Press [End], this will move you to the end of the line. Then Press [ENTER]. It should look like below

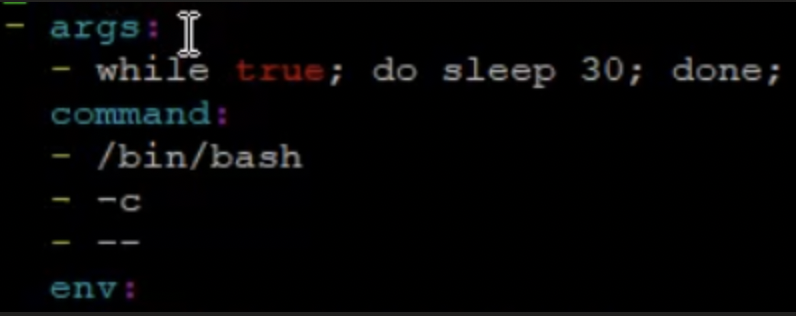
Now move the cursor to be inline with imagePullPolicy and paste the following
YAMLcommand: ["/bin/bash","-c","--"] args: ["while true; do sleep 30; done;"]The configuration should now look like the following

Search for the line that is called initialDelaySeconds and add a 0 to the end.
Press [ESC] then type :wq and Press [ENTER]
If no mistakes were present and the system accepts the change you will drop out of the editor completely without error. If errors or issues are present the editor will go back to config. If you are unsure of an error that was made it is safest to Press [ESC] then type :q! which will quite without saving. Please restart the edit process above.
If the changes were successful, the pod may automatically restart and enter a running state. If it doesn’t please delete the pod and wait for it to enter the running state. You can now enter the pod with the usual commands.
🔖 NOTE: The above prevents the normal services from starting in the pod. You are able to make configuration changes inside the pod and repair file structure issues etc.Once your changes or repairs are complete you can perform the following steps to roll back the pause.
Edit the relevant statefulset or deployment
Remove the lines above env: and below containers are per screenshot below (pressing d twice will completely remove a line at a time and is the safest option)

Modify the env line to line up with the containers line and then add a preceding hyphen and space as per below screenshot

Press [ESC] and then type :wq and Press [ENTER]
Please repeat step 13.
